Nutanix AHV
This document will provide you with instructions on how to prepare and register your own Windows OS template image in AHV for use with Frame. Before moving forward with the preparation procedure, please ensure you have read through the general requirements on the BYO image and considerations on the Windows BYO image pages. We will outline additional details specific to Nutanix AHV below.
You must create and register at least one template or "gold" image when registering your AHV cluster to have an AHV Cloud Account in Frame. This template image will be used to create the Frame Sandbox and Utility Server(s) (optional) when you create a Frame account.
Additional template images can be created and registered after the AHV Cloud Account is created.
Considerations
When preparing to create a Windows 10 or Windows 11 OS image, you must consider the following:
Do not install Nutanix Guest Tools in your template image. Nutanix Guest Tools can cause communication issues between the workload instances and the Frame control plane.
If your image already has Nutanix Guest Tools installed, you must install VirtIO drivers before uninstalling Nutanix Guest Tools. If you attempt to remove Nutanix Guest Tools without first installing VirtIO drivers, your virtual machine will not boot.
Use SATA as the interface for CD-ROM and SCSI for disk drives when creating a VM in Prism Central or Prism Element. Do not use IDE as the interface for CD-ROM or disk drives. This is mandatory for BYO Windows 11 with vTPM images.
Do not use volume groups disks.
Set your template image timezone to UTC. When users start a Frame session, the workload VM will be set, by default, to the correct timezone based on the user's browser locale.
When setting up the template image, it can be useful to have the Windows Firewall disabled. Firewall can be customized and re-enabled later in the Sandbox for a Frame account. To do so, run the following command in Powershell.
Set-NetFirewallProfile -Profile Domain, Public, Private -Enabled FalseIf you do not wish to disable Windows Firewall but still want to enable RDP, run the following command in PowerShell.
Enable-NetFirewallRule -DisplayGroup "Remote Desktop"Enable Microsoft RDP in your template image before installing the Frame Guest Agent to access the template image VM. Verify you can access your template image using RDP with your local Windows administrator user. Ensure RDP is allowed in the Windows Firewall for your template image.
Preparation
First, starting with a Windows 10, Windows 11, Windows Server 2019, or Windows Server 2022 image, create a VM in the AHV cluster you are going to use for Frame. When configuring your image, you must use a Windows OS user account with local Windows administrator privileges. If you are bringing a Windows 11 image with vTPM, review and complete the required tasks following the Windows 11 with vTPM section of this guide, before continuing with Step 2.
Use RDP to connect into your VM. Follow the Installation and Usage instructions to download the Frame Agent Setup Tool (FAST) and install the Frame Agent, drivers, and tools in your template image VM.
- Once FAST has successfully installed the Frame Agent, drivers, and tools, reboot the VM to complete the installation of the Frame Agent. Use RDP to connect back into your VM.
For additional installation scenarios (e.g., proxy server configuration, command line arguments, review our Frame Agent Setup Tool documentation.
(Optional): If a proxy server is required for all outbound traffic to the Internet from your private network, you will need to configure Frame Guest Agent to use your proxy server. Refer to our FGA Proxy Helper Tool documentation page for further details.
(Optional): If you plan to use NVIDIA GPU-based instance types on your AHV cluster, you can either install the appropriate NVIDIA GPU drivers in your template image VM (if all of your Frame accounts will use the NVIDIA GPU) or install the NVIDIA GPU drivers in the Frame account Sandbox (if not all Frame accounts will use the NVIDIA GPU). Refer to the requirements in our BYO AHV Infrastructure guide.
(Optional): Install your applications and finish image customization.
Once you have configured the image as desired, launch Powershell as an administrator.
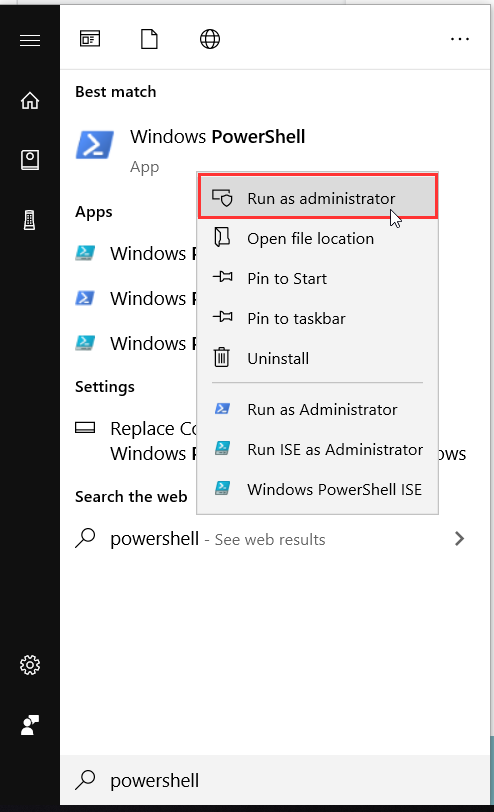
- Run the following PowerShell command to generalize your image using Microsoft Sysprep:
Start-Process -FilePath "$env:windir\System32\Sysprep\Sysprep.exe" -ArgumentList "/oobe /shutdown /generalize /unattend:$env:programdata\Nutanix\Frame\Sysprep\Unattend.xml" -Wait -NoNewWindow
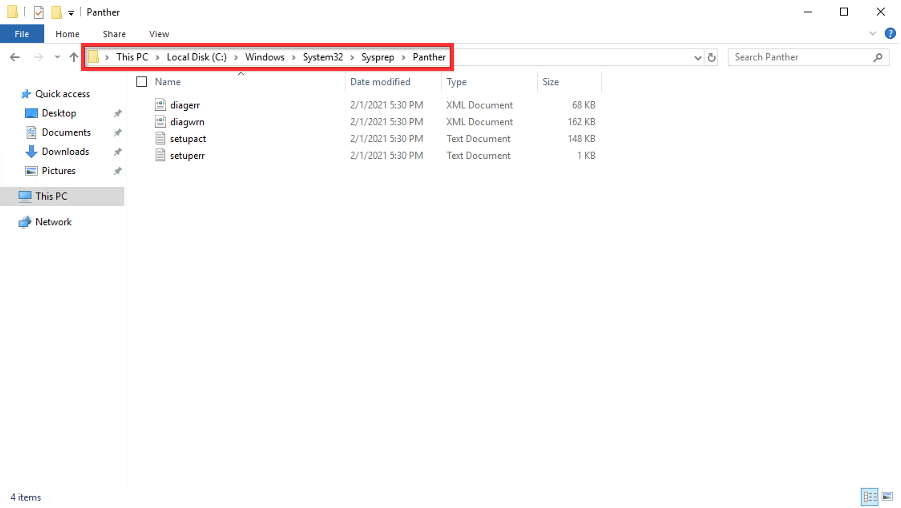
- If the VM does not shutdown, then there was a problem with sysprep. Review the sysprep logs in
%WINDIR%\System32\Sysprep\Pantherto determine the source of the error.
- When sysprep is successful, the VM will automatically power off. Verify that the VM has stopped in Prism.
Tag VM
Navigate to the list of VMs in Prism. Click on the VM you created in the previous step, open the "More" drop-down menu, and select "Manage Categories".
Put the VM in the
FrameRolecategory with the valueMasterTemplateAdd the category
FrameGuestAgentKindwith the valuefga.
Ensure the MasterTemplate VM does not get deleted. Otherwise, you will not be able to create Frame accounts using that template image.
Voilà! You have successfully created a template image to be registered in Frame for use to create your Frame workloads. You may prepare additional template images (e.g., different Windows OS versions, template images with different sets of applications) by simply repeating the procedure with a new image.
Registration
Now it's time to register your template image in Frame. See how to do this in our Cloud Accounts > Template Images guide.
Windows 11 vTPM Support
For customers who wish to use Windows 11 with Virtual Trusted Platform Module (vTPM), you must first create and enable your template image VM with Secure Boot and vTPM, following the instructions in Nutanix documentation (AOS 6.6) and summarized below.
Requirements
- Prism Central version pc.2022.9 or above
- AHV version 20220304.242 or above
- AOS version 6.5.1 or above
- VM must use UEFI firmware
- Secure Boot-enabled VM required with minimum Nutanix VirtIO package version of 1.2.1 or higher (for Windows 11 with vTPM)
Limitations
- You must create a new VM configured for SATA CD-ROMs and disks to use Secure Boot. VMs that use IDE disks or legacy BIOS cannot be converted to use Secure Boot.
- vTPM-enabled VMs cannot be used in a Frame account configured for Disaster Recovery Backup as production domain snapshots are not supported as of AOS version 6.6.
References
- Nutanix vTPM Support
- Nutanix UEFI Support for VM
- Understanding UEFI, Secure Boot, and TPM in the Virtualized Environment
- Windows 11 and AHV
Procedure
The following instructions are for the scenario where you are installing Windows 11 from a Microsoft Windows 11 ISO and Nutanix VirtIO drivers from a Nutanix ISO:
Log in to Prism Element or Prism Central and create a new VM, enabling UEFI and Secure Boot.
Connect to any CVM via CLI and run in aCLI:
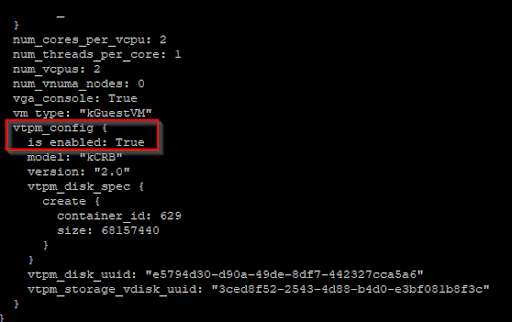
vm.update <vm_name> virtual_tpm=trueConfiguration can be verified by running in aCLI:
vm.get <vm_name>You would expect to see an aCLI response like:
Go back to Prism Element or Prism Central and create and attach two CD-ROM (SATA) drives for the Windows 11 and VirtIO ISOs.
Finally, create a sufficiently-sized boot disk that has enough capacity to house the Windows 11 OS plus an additional ~20 GB of free space (45-80GB in total). Disk capacity can be increased later when a Frame account is created using this template image.
Power on the VM and run the Windows installer to install Windows 11 on the VM.
Return to Preparation to install the Frame Agent and prepare the VM to be used in Frame.