Microsoft OneDrive is an online cloud storage service that integrates with the Windows Operating System as a default location for saving files, such as photos or documents, across multiple devices. While the basic functionality of OneDrive requires no administrative action, your business requirements may be more unique and/or extensive.
This solutions guide discusses the basics of how OneDrive works as well as provides detailed information on how it can be utilized within your Frame environment, including installation and configuration, as well as best practices on OneDrive and profile management.'
Requirements
- A Frame Account
- Persistent Desktops or Non-Persistent Desktops using Frame Enterprise Profiles or another 3rd party profile management solution:
- Necessary for the persistence of Microsoft OneDrive credentials between sessions
In non-persistent scenarios, by default, this configuration will require users to log on to OneDrive each time they start a Frame session. Frame Enterprise Profiles, or a different 3rd party profile management solution, can be configured to avoid this issue. Once Enterprise Profiles have been enabled for the account, the end user needs only to log in to OneDrive once within the session. From that point forward, OneDrive will automatically stay logged in using the credentials stored on the user's profile disk.
Microsoft OneDrive Installation Types
OneDrive installation can have multiple paths, depending on your chosen operating system. It can be installed standalone either in a per-user or a per-machine context, or it can be installed as part of the Microsoft 365 bundle, if desired.
If you wish to install OneDrive as part of the Microsoft 365 bundle, please use the Frame Solutions Guide denoted here. From there, you can return to this solutions guide to read more about customization.
Let’s break down the two standalone installation types.
There are two ways that per-user installations of OneDrive can go:
- Automated: The installation occurs automatically by the Operating System upon each new user’s logon, although this only happens on the Windows 10/11 operating systems
- Manual: It is manually installed, or deployed via third party endpoint management solutions, like Microsoft’s Endpoint Configuration Manager (MECM, formerly SCCM), for the Windows Server operating systems, or on Windows 10/11 in scenarios where the automated installation was removed.
Installation Type: Automated
Let’s first delve into the automated per-user installation. This is achieved by the use of a Run Startup value in the registry that exists in the Default Users registry hive. When a new user logs into a system for the first time, the default profile is copied to create the new users’ initial profile. The Run Startup value is then run by the operating system, installing OneDrive in a per-user context. This Run value exists at SOFTWARE\Microsoft\Windows\CurrentVersion\Run and is deleted from the user’s registry after being executed.

Installation Type: Manual
For manual installation, the installation is extremely simple; on Windows 10/11 you install the application using the same executable that is used for the automated method, although the per-user and per-machine manual method differ slightly.

For Windows Server, you must download the OneDrive installer from Microsoft.
Identifying the OneDrive Installation Type
If you are using Windows 10/11 and want to determine the type of your current OneDrive installation, follow the guide below. If you are using Windows Server or already know your installation type, feel free to skip to the [Microsoft OneDrive Installation Instructions section].
The list of applications installed in an OS can be viewed through the Programs and Features applet (appwiz.cpl), but this doesn't always tell you whether or not an application is installed per-user or per-machine. Luckily there are registry locations that help you to determine more information about the application installs. There are multiple locations in the registry that help you identify not only ALL the installed applications (even those not shown in Programs and Features), but also help you identify machine vs. user installations as well as 32-bit vs 64-bit installations. These registry locations are:
| Registry Path | Discernable OneDrive version |
|---|---|
HKLM:\SOFTWARE\Microsoft\Windows\CurrentVersion\Uninstall | 64-bit per-machine installation |
HKLM:\SOFTWARE\WOW6432Node\Windows\CurrentVersion\Uninstall | 32-bit per-machine installation |
HKCU:\SOFTWARE\Microsoft\Windows\CurrentVersion\Uninstall | 64-bit & 32-bit per-user installation |
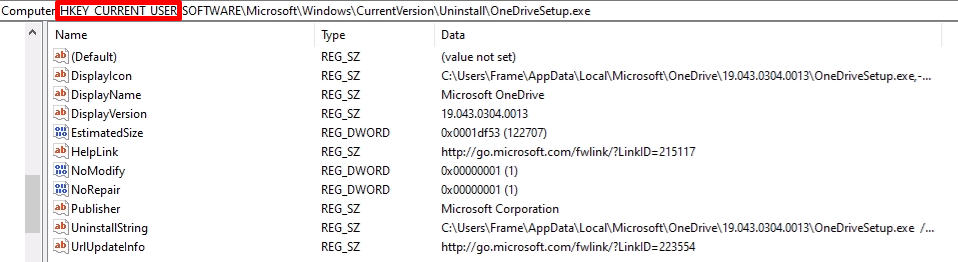
Using the above information, if you look at HKCU:\SOFTWARE\Microsoft\Windows\CurrentVersion\Uninstall and see a subkey called OneDriveSetup.exe, then your OneDrive installation is per-user.
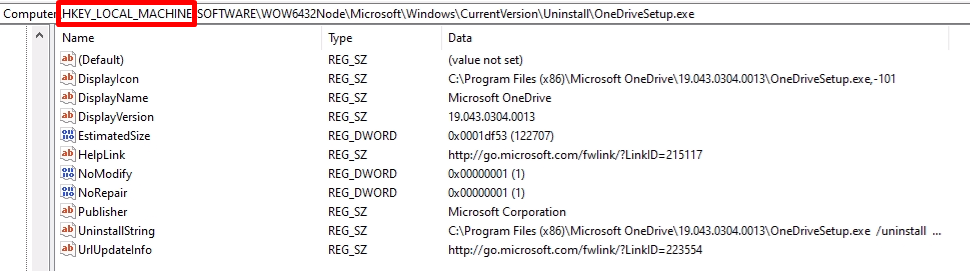
If you look at HKLM:\SOFTWARE\WOW6432Node\Microsoft\Windows\CurrentVersion\Uninstall and see a subkey called OneDriveSetup.exe, then your OneDrive installation is per-machine.
The following PowerShell commands, run sequentially, can help determine if OneDrive is installed per-user or per-machine:
- Run:
$PerUser = Test-Path -Path “HKCU:\SOFTWARE\Microsoft\Windows\CurrentVersion\Uninstall\OneDriveSetup.exe” - Run:
$PerMachine32 = Test-Path -Path “HKLM:\SOFTWARE\WOW6432Node\Microsoft\Windows\CurrentVersion\Uninstall\OneDriveSetup.exe” - Run:
$PerMachine64 = Test-Path -Path “HKLM:\SOFTWARE\Microsoft\Windows\CurrentVersion\Uninstall\OneDriveSetup.exe” - Lastly, run:Once the commands above are ran sequentially, your console window will display your OneDrive installation type.
If ($PerUser -eq “True”) {“OneDrive is installed Per-User”} ElseIf ($PerMachine32 -eq “True”) {“OneDrive is installed Per-Machine.”} ElseIf ($PerMachine64 -eq “True”) {“OneDrive is installed Per-Machine.”}
Remove Per-user Installations of OneDrive
If you wish to remove the per-user installation of OneDrive on Windows 10/11, The easiest ways to do so are through the Programs and Features applet or via PowerShell. As it can be a command-line removed, this allows the use of endpoint management solutions, which will not be covered by this guide.
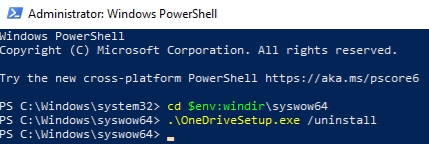
- Open an elevated PowerShell window.
- Change the directory to
C:\Windows\SysWOW64(cd $env:windir\syswow64) - Run
.\onedrivesetup.exe /uninstall. This command will have no output in PowerShell.
Microsoft OneDrive Installation Instructions
For Windows 10/11, the OneDrive executable already exists within the Operating System and is located at %WINDIR%\syswow64\onedrivesetup.exe. Please note this version of the installer is the same version that was built into the operating system when it was created, which is generally going to be very out of date. As such, it may be worthwhile to download the newest version directly from Microsoft. If you download a newer version the instructions below will need to be altered to install OneDrive from the new installer location.
For Windows Server, the installer must be downloaded directly from Microsoft.
For the per-machine installation, you will need to install OneDrive in your Sandbox, configure OneDrive as desired, and then publish your changes.
For the per-user installation, installing OneDrive in your Sandbox provides very little benefit, as the scenarios in which it will work as you designed are very limited. For more information about default profiles in Frame, see here.
Per-user
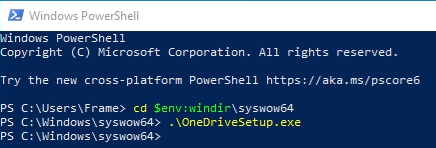
- Open a non-elevated PowerShell window.
- Change the directory to
C:\Windows\SysWOW64(cd $env:windir\syswow64) - Run
.\onedrivesetup.exe. This command will have no output in PowerShell, but the OneDrive installer window will be visible during the installation.
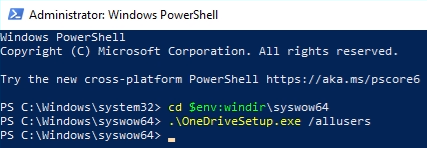
Per-machine
- Open an elevated PowerShell window.
- Run
Set-ItemProperty -Path “HKLM:\SOFTWARE\Microsoft\OneDrive” -Name “AllUsersInstall” -Type DWORD -Value “1” - Change the directory to
C:\Windows\SysWOW64(cd $env:windir\syswow64) - Run
.\onedrivesetup.exe /allusers. This command will have no output in PowerShell, but the OneDrive installer window will be visible during the installation.
OneDrive Application Customization
Microsoft OneDrive can be customized for a specific end user experience. This can be accomplished locally within the Sandbox through the registry or local policies, as well as via group policies in domain joined scenarios. For the purposes of this guide, to cover as many use cases as possible, the instructions will be written by implementing via the registry.
For those wishing to implement via policy, please see the official documentation provided by Microsoft.
For the purposes of this guide, we will be discussing and implementing customizations based upon OneDrive version 21.220.1024.0005.
The below list of policies are based upon the common customizations when integrating with Frame. If you wish to view all possible policies related to OneDrive, please see Microsoft’s full documentation on the subject.
If you want the OneDrive application to start for all users, after the user has logged in, execute in the Sandbox:
Set-ItemProperty -Path "HKLM:\SOFTWARE\Microsoft\Windows\CurrentVersion\Run" -Name "OneDrive" -Value '"C:\Program Files (x86)\Microsoft OneDrive\OneDrive.exe /background"'For non-persistent Frame accounts, best practice is to configure OneDrive for Files On-Demand:
Set-ItemProperty -Path "HKLM:\Software\Policies\Microsoft\OneDrive" -Name "FilesOnDemandEnabled" -Type DWord -Value 1To redirect “Windows Known Folders” to OneDrive using the Known Folders Move capability. This command supersedes the specific folders denoted further below:
Set-ItemProperty -Path "HKLM:\Software\Policies\Microsoft\OneDrive" -Name "KFMSilentOptIn" -Type String -Value "<your-AzureAdTenantID>"If you want to redirect only the user’s Desktop folder to OneDrive:
Set-ItemProperty -Path "HKLM:\Software\Policies\Microsoft\OneDrive" -Name "KFMSilentOptInDesktop" -Type DWord -Value 1If you want to redirect only the user’s Documents folder to OneDrive:
Set-ItemProperty -Path "HKLM:\Software\Policies\Microsoft\OneDrive" -Name "KFMSilentOptInDocuments" -Type DWord -Value 1If you want to redirect only the user’s Pictures folder to OneDrive:
Set-ItemProperty -Path "HKLM:\Software\Policies\Microsoft\OneDrive" -Name "KFMSilentOptInPictures" -Type DWord -Value 1To Disable the Tutorial that appears at the end of the OneDrive setup process:
Set-ItemProperty -Path "HKLM:\Software\Policies\Microsoft\OneDrive" -Name “DisableTutorial” -Type DWORD -Value “1”
OneDrive Application Optimization
Luckily for you, Frame has an entire blog series dedicated to Application Optimizations, and features a post specific to Microsoft OneDrive. After finishing this document, head over there to see how best to optimize this application for your environment.
OneDrive with Profile Management
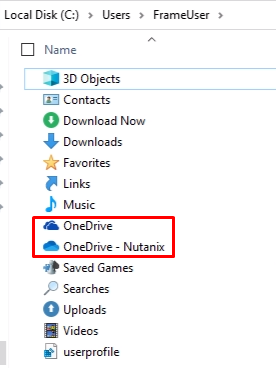
By default, OneDrive places its files at C:\Users\{username}\OneDrive - (Company Name), which being in C:\Users\{username} is part of the user profile and is therefore captured by most profile management tools, including Enterprise Profiles.
Even with the usage of the Files-on-Demand setting discussed in the Customizations section above, there is a possibility of the user syncing a file or folder locally, which would increase the size of the profile disk for data that already exists in the cloud.
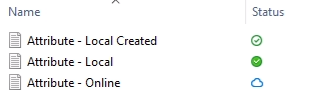
There are variables that tell us whether or not the file or folder within OneDrive exist locally or only in the cloud. When viewed with File Explorer, next to all files within OneDrive is an icon which visually tells you the status of the files.
When the files or folders are created locally, you will see a  icon. When the files or folders exist online only, you will see a
  icon. When the files or folders are pulled local, you will see a icon. You can change the status of the files through two right click contextual menu options.


If you wish to remove these contextual menu items for your users, that can be done. To do so, execute the following PowerShell commands in the Sandbox.
- Create the registry key:
New-Item -Path “HKLM:\SOFTWARE\Microsoft\Windows\CurrentVersion\Shell Extensions\Blocked”
- Create the registry value:
Set-ItemProperty -Path “HKLM:\SOFTWARE\Microsoft\Windows\CurrentVersion\Shell Extensions\Blocked” -Name “CB3D0F55-BC2C-4C1A-85ED-23ED75B5106B}” -Type String -Value “”

Please be aware that removing these options doesn’t prevent your users from being able to download the files, as that will happen naturally when an offline file is opened, it just removes the options from the right click contextual menu.
These settings, whether the file/folder exists locally or online only, are file attributes that can be determined via command line, by using the attrib command against the file or folder in question. Looking at this folder, you can tell by the icons that the Attribute – Local Created file was locally created, while the Attribute – Local file was marked with “Always keep on device” and the Attribute – Online is Online Only, all due to the icon.
Now, using a non-elevated PowerShell, you can find the same information with the attrib command, although it’s harder to understand. To test yourself, use the attrib “folder\file or folder\*” command. In my screenshot below, I used:
attrib “env:userprofile\OneDrive – Nutanix\Desktop\Attribute Test\*”
Since this OneDrive environment is specific to me, it probably won’t work for you, but you can change the OneDrive – Nutanix folder to match your environment to get results.

So, the Attribute – Local Created file only has the attribute of A, which means Archive. Since the file is local only, this makes sense. The Attribute – Local file has attributes of A and P, P meaning Pinned. This means the Pinned attribute file has been marked with Always keep on this device. The Attribute – Online file has attributes of A, O, and U. O means the file is Online, while U means the file is Unpinned. This means the combination of the Online and Unpinned attributes file has been marked with Free up space.
As such, changing the sync status of an OneDrive file or folder is as simple as changing the attributes of the files/folders themselves. For this, again, we use the attrib command, but rather than just view the attribute types, we change them using the command attrib “(File Location)\(File Name)” +U -P. In this scenario, the +U gives the file the Unpinned attribute, while the -P removes the Pinned attribute.

But that’s just a file. If you wish to do this against a folder, it’s slightly different, and that’s a folder you know by name. What if it’s thousands of files within hundreds of folders and sub-folders, all that you don’t want to have to enumerate within a script? Luckily there is a command for that. I won’t break the whole thing down, at its core it’s just a far more complicated command than what we talked about above, but looks at every file within every folder in the OneDrive – (Company) folder, changing the attributes of any marked with P to U.
Get-ChildItem $((Get-ChildItem $env:USERPROFILE -Filter "OneDrive -*").FullName) -Exclude "*.url" -Recurse |

    Where {! $_.PSIsContainer } |

    Select Fullname, @{n='Attributes';e={[fileAttributesex]$_.Attributes.Value__}} |

    where-Object { ($_.Attributes -cnotmatch "Unpinned") -or ($_.Attributes -cnotmatch "Offline") -And ($_.Attributes -cnotmatch "RecallOnDataAccess")  } |

    Foreach {  attrib.exe $_.fullname +U -P /S }
Now, when would you run this command? Since it’s user-specific, you have to run it in the user context, but you don’t want to run while the user may be using those files. We could use a Scheduled Task that executes the command when triggered at logoff, but as a DaaS, Frame handles the logoff procedure, so there’s no guarantee this command will complete fully before Frame does so.
In comes Frame Scripting, saving the day. Using the FrameScriptHelper tool inside the Sandbox we create a Frame Script that runs the above command at user logoff only on the workload VMs. In Frame Scripting language, user logoff means post-session, so that’s the "when". The "where" is tied to the pool types, in this scenario we will want to use both shadow and production, to make sure we capture all possible workload VM pool types. Make sure to set the Error Policy to Continue.
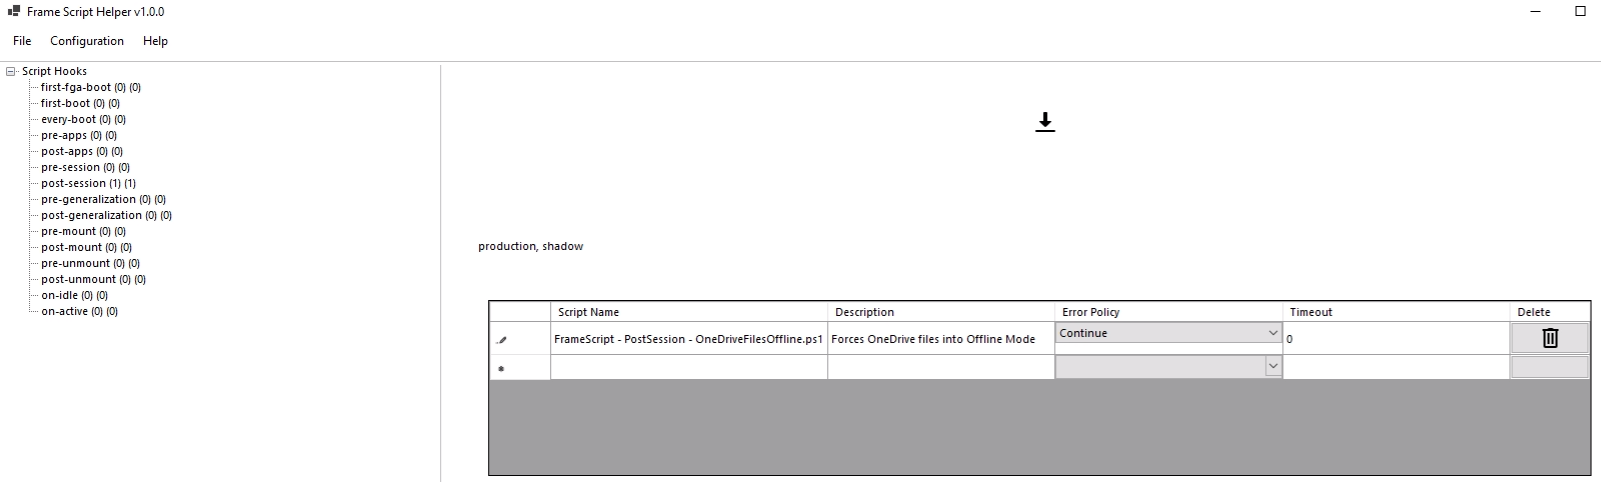
Be aware that the command given above recurses through all the files in the given location. As such, the length of time to run the script will increase the more files exist in the location. The size of the files don’t matter, as we are just looking at the attributes, just the amount of files. This script can cause longer than normal logoff times, if that is something you are monitoring in your environment.
Make sure to follow all guidance in the Frame Scripting documentation page, such as where to place the script for Frame to run it, otherwise the script will not run or work as desired in your workload VMs.
Additional Information
If you wish to fully remove OneDrive from your environment, this is also possible. The script below will:
- Find and remove a per-user installation of OneDrive.
- Remove all existing OneDrive Scheduled Tasks.
- Remove the Per-User Run Key
- Change the EnableTHDFFeatures registry value to 0.
Click here to view the full script
#Is OneDrive Currently Running?


If (Get-Process -ProcessName OneDrive -ErrorAction SilentlyContinue) {

"The OneDrive Process is currently running.  Stopping the process."

Stop-Process -ProcessName "OneDrive"

Wait-Process -ProcessName "OneDrive"

Start-Sleep -Seconds 2

"Verifying OneDrive Process has stopped."

If (Get-Process -ProcessName OneDrive -ErrorAction SilentlyContinue) {

"The OneDrive Process has not stopped.  Please stop manually before executing script again.  Exiting Script."

Exit

}

Else {

"The OneDrive Process has stopped.  Moving On."

}

}

Else {

"The OneDrive Process is not currently running.  Moving On."

}


#Is OneDrive Currently Installed


$PerUser = "HKCU:\SOFTWARE\Microsoft\Windows\CurrentVersion\Uninstall\OneDriveSetup.exe"


If (Test-Path -Path $PerUser) {

"Per-User Installation of OneDrive found.  Uninstalling..."

Start-Process "$env:windir\SysWow64\OneDriveSetup.exe" /uninstall -Wait

"Verifying removal of Per-User Installation of OneDrive."

If (Test-Path -Path "HKCU:\SOFTWARE\Microsoft\Windows\CurrentVersion\Uninstall\OneDriveSetup.exe") {

"Removal of Per-User OneDrive failed.  Please remove manually before executing script again.  Exiting Script."

Exit

}

Else {

"Removal of Per-User OneDrive completed successfully.  Moving on."

}

}

Else {

"OneDrive is not currently installed.  Moving on."

}


#Optimization of OneDrive


"Removing all known aspects of OneDrive."


"Checking existence of Per-User OneDrive Updater Tasks"

$PerUserScheduledTask = Get-ScheduledTask | Where-Object {$_.TaskName -like "OneDrive*"}

If ($PerUserScheduledTask) {

"Per-User OneDrive Scheduled Tasks Exist.  Deleting."

Unregister-ScheduledTask -TaskName "OneDrive*" -Confirm:$False

"Verifying deletion of Per-User OneDrive Scheduled Tasks."

$PerUserScheduledTask = Get-ScheduledTask | Where-Object {$_.TaskName -like "OneDrive*"}

If ($PerUserScheduledTask) {

"Deletion of Per-User OneDrive Scheduled Tasks failed.  Please delete manually.  Moving on."

}

Else {

"Deletion of Per-user OneDrive Scheduled Tasks completed successfully.  Moving on."

}

}


"Loading Default Registry..."

Reg Load HKEY_Users\Default "C:\Users\Default\NTUser.dat"

"Verifying Load of Default Registry."

If (Test-Path -Path "Registry::HKU\Default\Software") {

"Default Registry loaded!"

}

Else {

"Default Registry not loaded.  Exiting Script."

Exit

}

"Checking existence of Startup Registry Value for OneDrive in Default User Registry Hive."

$ODS = (Get-ItemProperty -Path "Registry::HKU\Default\SOFTWARE\Microsoft\Windows\CurrentVersion\Run").PSObject.Properties.Name -contains "OneDriveSetup"

If ($ODS -eq "True") {

"OneDrive Startup Registry Value found."

"Removing Startup Registry Value for OneDrive in Default User Registry Hive."

Remove-ItemProperty -Path "Registry::HKU\Default\Software\Microsoft\Windows\CurrentVersion\Run" -Name "OneDriveSetup" -ErrorAction SilentlyContinue

"Verifying Removal of Default User Startup Value."

$ODS = (Get-ItemProperty -Path "Registry::HKU\Default\SOFTWARE\Microsoft\Windows\CurrentVersion\Run").PSObject.Properties.Name -contains "OneDriveSetup"

If ($ODS -eq "True") {

"OneDrive Startup Registry Value still exists.  Please delete manually.  Moving on."

}

ElseIf ($ODS -eq "False") {

"OneDrive Startup Registry Value optimized.  Moving on."

}

}

"Checking status of EnableTHDFFeatures registry value."

$ETHDFF = (Get-ItemProperty -Path "Registry::HKU\Default\SOFTWARE\Microsoft\OneDrive").PSObject.Properties.Name -contains "EnableTHDFFeatures"

If ($ETHDFF -eq "True") {

$ETHDFFValue = (Get-ItemProperty -Path "Registry::HKU\Default\SOFTWARE\Microsoft\OneDrive" -Name "EnableTHDFFeatures").EnableTHDFFeatures

If ($ETHDFFValue -eq "1") {

"EnableTHDFFeatures set to 1.  Optimizing..."

Set-ItemProperty -Path "Registry::HKU\Default\SOFTWARE\Microsoft\OneDrive" -Name "EnableTHDFFeatures" -Value "0"

"Verifying EnableTHDFFeatures is optimized."

$ETHDFFValue = (Get-ItemProperty -Path "Registry::HKU\Default\SOFTWARE\Microsoft\OneDrive" -Name "EnableTHDFFeatures").EnableTHDFFeatures

If ($ETHDFFValue -eq "1") {

"EnableTHDFFeatures has not be optimized.  Please optimize manually.  Moving on."

}

ElseIf ($ETHDFFValue -eq "0") {

"EnableTHDFFeatures has be optimized.  Moving on."

}

}

}

"Unloading Default User Registry Hive."

Reg Unload HKEY_Users\Default

"Verifying Default User Registry Hive Unloaded."

$DURHUnload = Test-Path "Registry::HKU\Default\Software"

If ($DURHUnload -eq "True") {

"Default User Registry Hive was not unloaded.  Please unload manually.  Moving on."

}

ElseIf ($DURHUnload -eq "False") {

"Default User Registry Hive was unloaded successfully.  Moving on."

}
Conclusion
The installation and configuration of Microsoft OneDrive within Frame requires first the installation of the software in a per-machine context, after which multiple customization options are available to provide the type of user experience you desire; the ability to set up Files-On-Demand and Known Folders Move; and the ability to prevent OneDrive files from bloating your users profile.