If you're familiar with Frame, you probably know how awesome it is that we can stream high-performance sessions to any modern browser. While streaming Apps, Windows, and Linux desktops to a browser is neat, I'm here to walk you through how you can stream Frame to any website.
I'm talking about running Photoshop on adobe.com; or Lego's Studio software, but running straight from the Lego stud.io website – Just click a button and go! Instead of requiring a download for multiple operating systems, no support for mobile users (who commonly have a Bluetooth® keyboard and mouse, and a hi-res display), or even someone with a Chromebook (thinking of you, schools everywhere!).
Part One: Hello World!
Introducing Frame Session API! An easy-to-use Javascript library that makes it easy for any web developer to wire up Frame accounts to any website, use virtually any identity provider, and granularly control the Frame experience that users should have.
This article is intended to get your feet wet with Frame Session API. Do you have a Frame account? Have you ever created an index.html? Are you comfortable following along with some HTML, CSS, and Javascript? If so, I can guarantee that you'll have a working example that can run on your local computer by the end of this article. Prepare to experience the capability and simplicity of Frame Session API! But first, let's make sure you have everything needed to get started.
Prerequisites
- A published Frame account.
- Basic understanding of HTML, some CSS, and Javascript.
- Basic understanding of how code flows and is parsed and the concept of events.
- Basics about how a browser's DOM works.
- Python to serve our index.html to the browser. Please feel free to use any web server you're comfortable with!
Getting Started with the infamous index.html
Let's get started by making a new folder somewhere on your computer. In this example, we'll name this folder hello_frame.
Next, we will create a new text document and name it index.html with the following HTML inside:
<!DOCTYPE html>
<html lang="en">
  <head>
    <title>Hello, Frame!</title>
  </head>
  <body>
    <p>This is a really simple HTML file.</p>
  </body>
</html>
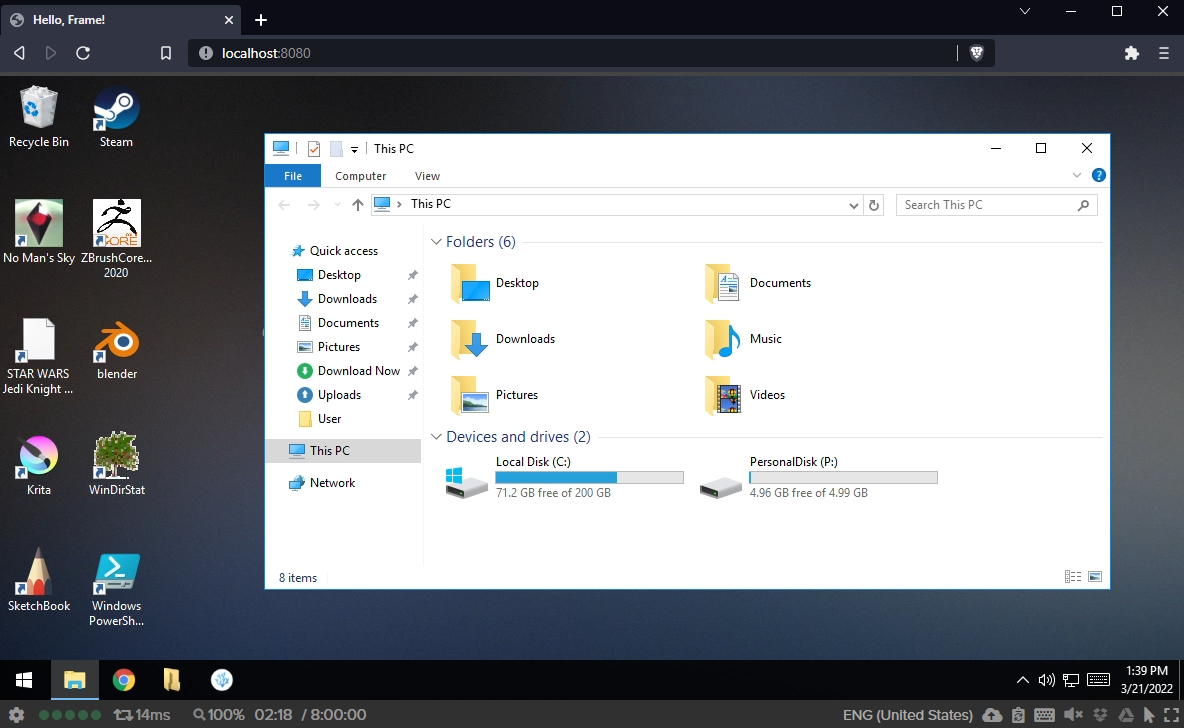
Opening this file with a browser should look something like this:

That's pretty basic… but a good start! Next, we'll add Frame!
In the <head> of our HTML document, we can include and load Frame Session API in a <script> tag like so (code highlighted in green represents new additions):
<head>
  <title>Hello, Frame!</title>
  <script src="https://unpkg.com/@fra.me/terminal-factory@2.38.0/api.js"></script>
</head>
This tells our HTML page to load Frame's Terminal Factory package, making it available for our custom Javascript as a global variable named FrameTerminalApi.
Now that we have access to Frame Session API, we'll add some room for our own custom Javascript code. At the end of the <body> tag, add another <script> for us to exercise our custom Javascript.
<body>
  <p>This is a really simple HTML file.</p>
  <script type="text/javascript">
    // Our custom code will go here!
  </script>
</body>
We're making progress! Next, we need to start putting together some account-specific details in the form of a JSON object, including an auth token.
We need a few things to get started:
A Service URL. This is the URL for the Frame platform/environment you're connecting to -- this value is pretty much the same for everyone using Frame. Here you go:
https://cpanel-backend-prod.frame.nutanix.com/api/graphqlOur Terminal Configuration ID. This unique identifier points to your Frame account, determines which Launchpad settings to use, and specifies which instance type will power our sessions. You can easily grab this from your Frame account's Launchpad by following these steps.
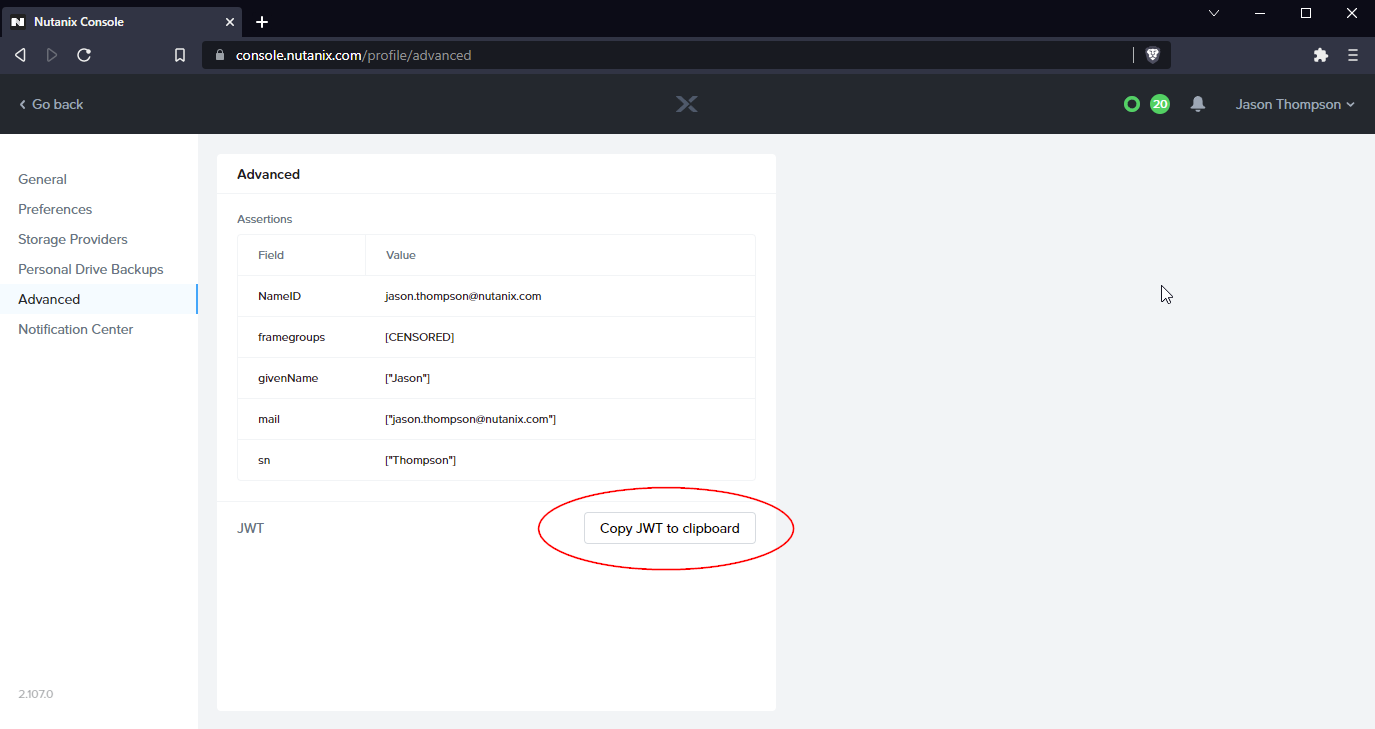
A JWT Auth Token. This token authenticates your Frame session, allowing secure access to your cloud VMs. Details on obtaining tokens via SAML integrations or API are found here. However, for simplicity, we can obtain our token from the Nutanix Console by first logging in, then navigate to
https://console.nutanix.com/profile/advancedand clicking the Copy JWT to clipboard button.
Be mindful of your token expiration! If your token expires, just repeat the process to grab a new one.
Putting it all together
Next, we'll create a new object and call it frameOptions. This will have the following three properties: serviceUrl, terminalConfigId, and token. Here's what yours should look like once you're done (your token should be pretty large, character-length wise):
<body>
  <p>This is a really simple HTML file.</p>
  <script type="text/javascript">
    const frameOptions = {
      serviceUrl: "https://cpanel-backend-prod.frame.nutanix.com/api/graphql",
      terminalConfigId:
        "c23b4ba1-c4d8-4bcf-8e62-d1f0d8477907.d3f6ffd6-7040-471b-b380-a3da7c964070",
      token: "eyJ0eXAiOiJKV1QiLCJhbGciOiJFUzI1NiJ9…",
    };
  </script>
</body>
Great! Now we can use our new frameOptions object to create an instance of the Frame Terminal via the Session API. To do this, we need to make a new instance of Frame's Terminal via the Session API's createInstance class method.
But first, it's best practice to ensure the page is done loading before we try to launch any sessions, especially when embedding Frame into “busy” websites. To do this, we will add a document Event Listener for DOMContentLoaded. Event Listeners allow us to tie our Javascript code to the browser/document's events as they happen, like so:
<script type="text/javascript">
  const frameOptions = document.addEventListener(
    // …
    "DOMContentLoaded",
    function () {
      console.info("This page has fully loaded.");
    }
  );
</script>
Next, we can pass our frameOptions into createInstance to create our own terminal instance, stored in a new constant variable named “terminal”.
document.addEventListener("DOMContentLoaded", async function () {
  console.info("This page has fully loaded.");
  const terminal = await FrameTerminalApi.createInstance(frameOptions);
});
Starting our first session via API
Now that we have a terminal object, we can start having fun and connect to a VM! To do that, we asynchronously await the use of terminal.start(), like so:
document.addEventListener("DOMContentLoaded", async function () {
  console.info("This page has fully loaded.");
  const terminal = await FrameTerminalApi.createInstance(frameOptions);

  console.info("Starting session!");
  const session = await terminal.start();
  console.info("Session started!");
});
Now, if you're like me, your VMs are powered off on a test Frame account to conserve money and resources. Knowing this, it may take a minute or two to get connected to your VM once we've kicked off terminal.start(). If a VM is already running and waiting for us, we can connect in just a few seconds – otherwise, we have to wait for the VM to power on and boot into Windows and for Frame to start streaming. 😊
Now, save index.html. It's time to load it into the browser properly, with a web server.
A web server?
In order for Frame's APIs to work, it's designed to be served from an HTTP web server. For our simple example, we'll serve our index.HTML file with Python. I chose Python mostly because it's arguably the most popular programming language at this time.
If you have Python installed, we can use our terminal to navigate to our hello_frame directory.
Then, we can start a Python web server by entering the following command:
python -m http.server
By default, this will serve whatever directory your terminal is currently located in to http://localhost:8000. However, you may notice in my screenshots that I'm using port 8080 – it makes no difference what port you use as long as it works. 😉
Starting our first session
Now that we're serving our index file with a web server, loading that URL into the browser won't show much. However, if you open the browser's developer tools, you'll see some of our messaging in the JS console:

After waiting a while (for my VM to fully boot into Windows), Frame delivers and we have a session!
Listening to and reacting to Session API events
We have a session, great! But it's not a great experience for users who have to wait for a VM to power on from a stopped state – nothing happens for up to 2 minutes!
If you're still in a session, let's quit it. Click on the Gear Menu at the bottom-left of the Frame session and select Close Session.
In order to tell the user a little bit more about what's going on in the page, we need to listen for and act on Frame Session API Terminal Events. We have a short list of session-related events that we can listen to:
- SESSION_STARTING
- SESSION_STARTED
- SESSION_RESUMING
- SESSION_RESUMED
- SESSION_CLOSING
- SESSION_CLOSED
- SESSION_DISCONNECTED
- USER_INACTIVE
Let's listen for these events and add a basic console.info call so we can get some details in the developer console about what's going on when these events happen. To do that, let's pull a list of the Terminal Events as TerminalEvent out of the FrameTerminalApi class:
document.addEventListener("DOMContentLoaded", async function () {
  console.info("This page has fully loaded.");
  const { TerminalEvent } = FrameTerminalApi;
  const terminal = await FrameTerminalApi.createInstance(frameOptions);

  console.info("Starting session!");
  const session = await terminal.start();
  console.info("Session started!");
});
Here, I'll add a listener for SESSION_STARTING that simply logs to the console that the session is starting.
document.addEventListener("DOMContentLoaded", async function () {
  console.info("This page has fully loaded.");
  const terminal = await FrameTerminalApi.createInstance(frameOptions);
  const { TerminalEvent } = FrameTerminalApi;

  terminal.bind(TerminalEvent.SESSION_STARTING, function (event) {
    console.info("Session is starting!");
  });

  console.info("Starting session!");
  const session = await terminal.start();
  console.info("Session started!");
});
That's good, but it could be better! Let's add the rest of the events. It should look something like this once we're done binding to each event:
document.addEventListener("DOMContentLoaded", async function () {
  console.info("This page has fully loaded.");
  const terminal = await FrameTerminalApi.createInstance(frameOptions);
  const { TerminalEvent } = FrameTerminalApi;

  terminal.bind(TerminalEvent.SESSION_STARTING, function (event) {
    console.info("Session is starting!");
  });

  terminal.bind(TerminalEvent.SESSION_STARTED, function (event) {
    console.info("Session has successfully started!");
  });

  terminal.bind(TerminalEvent.SESSION_RESUMING, function (event) {
    console.info("Resuming an existing session!");
  });

  terminal.bind(TerminalEvent.SESSION_RESUMED, function (event) {
    console.info("Successfully resumed an existing session.");
  });

  terminal.bind(TerminalEvent.SESSION_CLOSING, function (event) {
    console.info("Session is closing!");
  });

  terminal.bind(TerminalEvent.SESSION_CLOSED, function (event) {
    console.info("Session closed!");
  });

  terminal.bind(TerminalEvent.SESSION_DISCONNECTED, function (event) {
    console.info("Session disconnected!");
  });

  terminal.bind(TerminalEvent.USER_INACTIVE, function (event) {
    console.info(
      "Did the user step away? No keyboard or mouse movement received in a while..."
    );
  });

  console.info("Starting session!");
  const session = await terminal.start();
  console.info("Session started!");
});
There we go… now we're able to keep track of all the events that the Session API can throw at us… and act on them! Let's put this to use and wield these bindings to display something to our beloved users instead of forcing them to open the developer console and follow along like the nerds that you and I are.
Implement some kind of progress indicator
It's important for our users to know what's going on so they can have realistic expectations about what their software is doing. This helps them get a general idea of how long things can take. If we're going to make someone wait, we should at least put them in a nice environment by showing them progress. Use some CSS to serve up some pixelated tea with animated steam, or perhaps make the background a gorgeous view of a winter mountain sunset. We're doing none of that in this example! Today, we're keeping it simple – we're going to be wielding some more Javascript to append some more divs to our document! Still with me? Great! Let's go!
First, we're going to be adding dynamic <div> elements for each event that's thrown… as it's thrown! We'll start by making a container div for these events, identifying it by “events”. Back in the upper HTML of our document, let's add the following right below our <p> tag:
<body>
  <p>This is a really simple HTML file.</p>
  <div id="events">
    <div>Welcome!</div>
  </div>
  <script type="text/javascript">
      const frameOptions = // ...

    // ...
  </script>
</body>
Great! Now that we have that there, an #events div with its first event: a welcome message for our users when they laid the page! Now we can start dynamically adding event information to it! Because we have a decent sized list of possible events, let's start by creating a new function that does all the repetitive stuff for us.
We'll call this function “addEventItem” and it'll take a single parameter: the event description (string). This function will then create a new div from thin air, fill the div with our event description string text, then inject the new div into the “events” div we created earlier.
Our sparkly new function looks like this:
function addEventItem(event) {
  const eventContainer = document.getElementById("events");
  const eventDiv = document.createElement("div");
  eventDiv.innerHTML = event;
  eventDiv.classList.add("event-item");
  eventContainer.appendChild(eventDiv);
}
So what's going on here? Well, this function first grabs the div we created earlier and stores it as eventContainer. Then, we create a new div (called eventDiv in our js), then we add the event description to its inner HTML. Then, we plop (or “append”) that newly created div to the bottom/end of our eventContainer.
Next, let's start calling this function from our Terminal Event bindings!
terminal.bind(TerminalEvent.SESSION_STARTING, function (event) {
  console.info("Session is starting!");
  addEventItem("Session is starting!");
});

terminal.bind(TerminalEvent.SESSION_STARTED, function (event) {
  console.info("Session has successfully started!");
  addEventItem("Session has successfully started!");
});

terminal.bind(TerminalEvent.SESSION_RESUMING, function (event) {
  console.info("Resuming an existing session!");
  addEventItem("Resuming an existing session!");
});

terminal.bind(TerminalEvent.SESSION_RESUMED, function (event) {
  console.info("Successfully resumed an existing session.");
  addEventItem("Successfully resumed an existing session.");
});

terminal.bind(TerminalEvent.SESSION_CLOSING, function (event) {
  console.info("Session is closing!");
  addEventItem("Session is closing!");
});

terminal.bind(TerminalEvent.SESSION_CLOSED, function (event) {
  console.info("Session closed!");
  addEventItem("Session closed!");
});

terminal.bind(TerminalEvent.SESSION_DISCONNECTED, function (event) {
  console.info("Session disconnected!");
  addEventItem("Session disconnected!");
});

terminal.bind(TerminalEvent.USER_INACTIVE, function (event) {
  console.info(
    "Did the user step away? No keyboard or mouse movement received in a while..." +
      event.code
  );
  addEventItem(
    "User is a ghost! Keyboard and mouse lay dormant a little too long..."
  );
});
Ok, great! So, now we can know if/when the session is starting. And, my VM is currently warmed up so my sessions are connecting quickly (from a fresh page load).
Unfortunately, we can't know how far along a VM is in the boot process and getting into Windows/Linux. Many factors can increase boot times, including the size of the VM's disk volume, startup apps, and the infrastructure provider (AHV, GCP, Azure, and AWS). Most customers simply have an adequate min or buffer set for their account's capacity settings -- this is essential for populating the "production" VMs that we'll connect to.
Nonetheless, the easiest way to accommodate your users is to give them more information when a session is starting. Let's improve our SESSIONSTARTING description to set expectations if we're connecting to an _account that doesn't have instances running all the time:
terminal.bind(TerminalEvent.SESSION_STARTING, function (event) {
- console.info("Session is starting!");
- addEventItem("Session is starting!");
+ console.info("Session is starting! This may take up to 2 minutes...");
+ addEventItem("Session is starting! This may take up to 2 minutes...");
});
When to start a session, anyway?
We've added some useful info to the page when Terminal is in action, but what about users who accidentally refresh their browser while they're in a session… Can you call terminal.start() when that user already has an active session? No, you can't! Session API will think you're silly, yell at you in the console about a bad request, and call your dad.
Instead, what we can do is check for an existing session for the user before trying to start one. If an active session is found, let's resume it via terminal.resume()! If we find that the user doesn't have an active session, it's time to start a new one! Simple, right? I call this the “resume first, start later” approach and it handles just about every use-case people can encounter when accidentally closing their browser, their laptop battery dies, or someone loses WiFi for a hot minute.
Let's scroll down our code until we get past all the event bindings and see our older “Starting session” logs, along with our call to terminal.start. We're going to rip this out, upgrade it to use terminal.getOpenSession and terminal.resume, then slam it back in with its new bells and whistles. Most people may not notice the difference but they'll appreciate not being stuck on the side of the road if they accidentally close their tab and try again (it happens more often than you'd think, actually – manage your tabs better, people!).
// old and yucky
- console.info("Starting session!");
- const session = await terminal.start();
- console.info("Session started!");

// new hotness
+ const session = await terminal.getOpenSession();
+ if (session && session.state === "OPEN") {
+   await terminal.resume(session.id);
+ } else {
+   await terminal.start()
+ }
With this updated session resume/start logic, users can accidentally refresh/close their browser all they want! The next time the page is loaded, our code will try to resume if there's an active session found or simply start a new session.
What about that 1-Click stuff?
So far, we've implemented Frame in such a way that the session starts immediately when the page is loaded – Zero-clicks!™ Our users don't even break a sweat! Modern research tells us that's not good, unfortunately. This research also says it's occasionally healthy to sweat, apparently. So... let's bring on the clicks!
There's nothing clickier than a <button> – let's add one right underneath our <p> element. Then, let's use javascript to assign it to our constant variable "clicker" at the top of our <script> tag like this:
<body>
  <p>This is a really simple HTML file.</p>
  <button id="the-clicker" disabled>1-Click simplicity</button>
  <div id="events">
    <div>Welcome!</div>
  </div>
  <script type="text/javascript">
    const clicker = document.getElementById("the-clicker");
    // the rest of our awesome JS code
  </script>
</body>
If you notice, I added a disabled attribute. That's because we need to wait for the page to load and for Frame to be ready before our users should start clicking this thing. Additionally, we assigned the clicker variable at the top of our javascript section – this makes it available to us throughout our code. Finally, I gave it an ID of “the-clicker” (which isn't remotely a good name, but I don't get paid to name things). Using this ID, we'll add some code to listen for a click-event on this button, and disable the disabledness that we've initially enabled.
Scroll back down to our session starting logic. We're going to wrap this logic around a new listener for our button!
The old:
const session = await terminal.getOpenSession();
if (session && session.state === "OPEN") {
  await terminal.resume(session.id);
} else {
  await terminal.start();
}
The new:
clicker.addEventListener("click", async function (event) {
  event.preventDefault();
  const session = await terminal.getOpenSession();
  if (session && session.state === "OPEN") {
    await terminal.resume(session.id);
  } else {
    await terminal.start();
  }
});
clicker.disabled = false;
This is the part where someone in the audience asks, “...but shouldn't the button be disabled when the session is starting or resuming?”. To which I say “you got it, Bucko!” to a handsome fellow named Buck in the audience.
Let's ensure the button is disabled and enabled properly by binding the attribute to the corresponding Terminal Events. E.g. when the session is “starting” or “resumed”, as Buck mentioned, we want it disabled. When the session is “disconnected” or “closed”, we want that button clickable!
terminal.bind(TerminalEvent.SESSION_STARTING, function (event) {
  console.info("Session is starting! This may take up to 2 minutes...");
  addEventItem("Session is starting! This may take up to 2 minutes...");
  clicker.disabled = true;
});

// ...

terminal.bind(TerminalEvent.SESSION_RESUMING, function (event) {
  console.info("Resuming an existing session!");
  addEventItem("Resuming an existing session!");
  clicker.disabled = true;
});

// ...

terminal.bind(TerminalEvent.SESSION_CLOSED, function (event) {
  console.info("Session closed!");
  addEventItem("Session closed!");
  clicker.disabled = false;
});

terminal.bind(TerminalEvent.SESSION_DISCONNECTED, function (event) {
  console.info("Session disconnected!");
  addEventItem("Session disconnected!");
  clicker.disabled = false;
});
With that in place, we're looking pretty good from a UX point of view. Check it out:
We're not done yet though! We're still not doing anything in the way of handling any potential errors, and our page looks painfully bleak, so we'll tackle that next in Part 2; link below.
You made it this far? Wow! Thanks for reading! If you enjoyed that or just want to see where else we can take this, please continue to Intro to Session API - Part 2 where we'll add error handling and stylesheets!
Author