Secure Anonymous Tokens
Secure Anonymous Tokens (SATs) can be used to allow users to authenticate to Frame and in establishing Frame sessions using Frame Session API without prompting users for another set of credentials. These tokens, generated by a secure API call, enable admins to provide their users with access to Frame resources on-demand. Additionally, the SATs can be customized with additional parameters, including data that can be made available in the remote VM. There are many use cases where this type of authentication could be useful, such as software trials, demos, or kiosk experiences.
Overview
Using the SAT API, a web server can request a token on-demand (when a page or endpoint is requested, for example) and provide it to the Frame Session API for custom-tailored sessions, or pass the token to one of our Launchpad, Launch, or PWA links to instantly log your users in.
Getting Started
Requirements
- Frame administrator access (Customer, Organization, or Account level).
- Frame Admin API access enabled at Customer, Organization, or Account level.
- Secure Anonymous Token provider with an assigned Launchpad User role.
- Customer-specific location (e.g., web server, thin client) to host the custom Secure Anonymous Token API integration requesting SATs from the SAT provider.
- If Secure Anonymous Tokens are used with a Named User Subscription, then the SAT generation request must include a unique user identifier in order for Frame Platform to count the number of named users in a monthly billing cycle.
- If Secure Anonymous Tokens will not contain a unique user identifier, then the customer must purchase Max Concurrent User Subscriptions.
- Customers using Secure Anonymous Tokens and purchasing Microsoft RDS SAL licenses must comply with the reporting requirements if those RDS SALs are purchased via Frame.
- Secure Anonymous Tokens should not be used in combination with Personal Drives and/or Profiles.
REST API Credentials
The Secure Anonymous Token API is invoked over REST endpoints to retrieve tokens. This requires an API integration with the proper roles/permissions.
Creating a new API integration
To get started, be sure to login as an administrator to gain access to API settings.
There are two ways to create a new API integration:
a. From the Dashboard of the desired Frame account, navigate to the Users page.
b. If you start from the Frame Admin console, you can navigate to either the Customer or Organization page and select Users from the left-hand menu.
Enable the “API” toggle and Save.
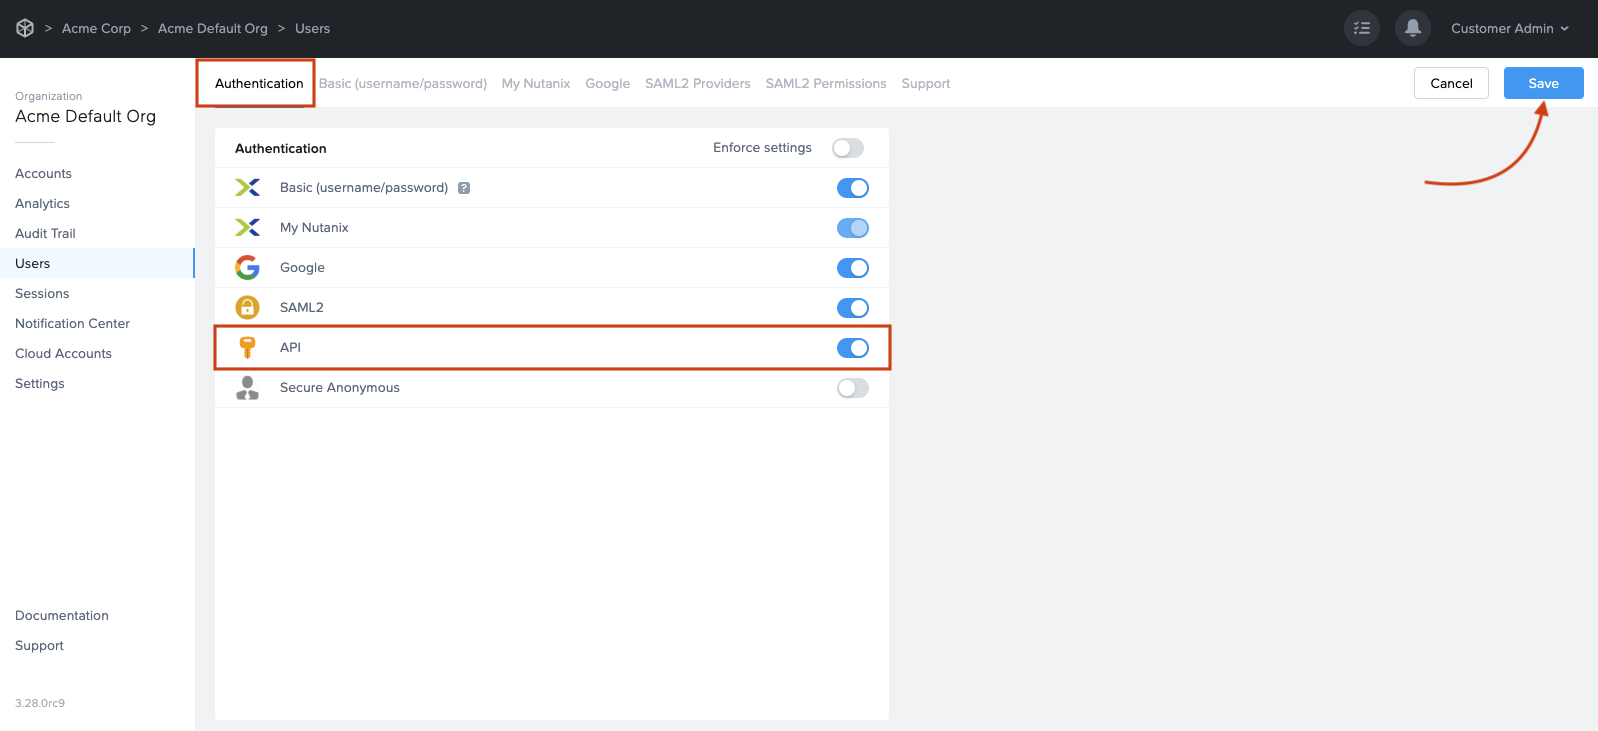
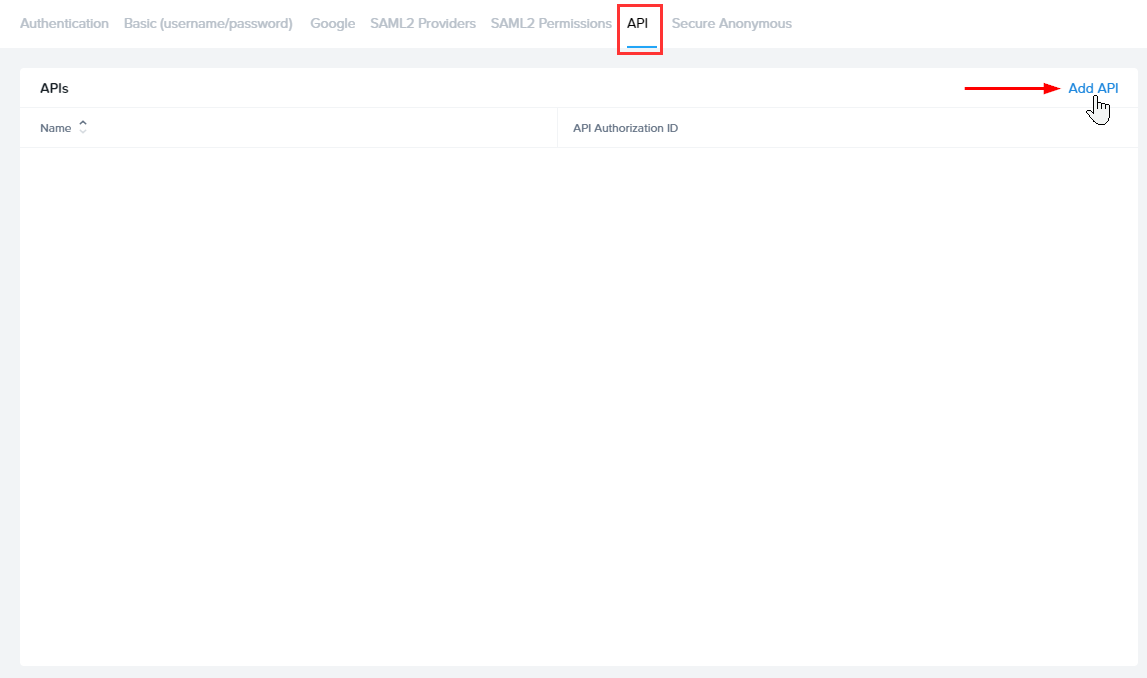
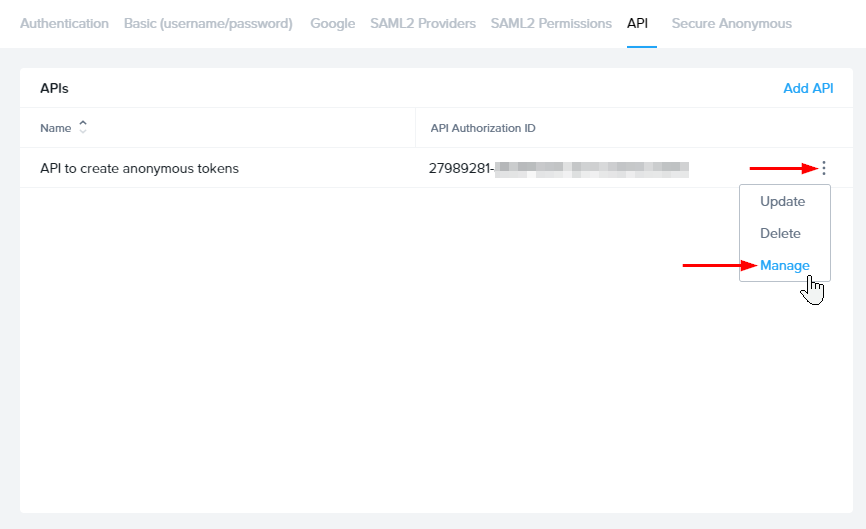
A new API tab will appear. Click on the API tab and then click the Add API link.
Give this new API integration a name; for this example, we'll use “API to create anonymous tokens”. Then, select a role and scope based on your scenario below.
For account-level integrations, choose the
API - Generate Anonymous Account Tokenrole, along with the account you're configuring access for.For organization or customer level integrations, you'll need to specify the
API - Generate Anonymous Organization TokenandAPI - Generate Anonymous Customer Token, respectively.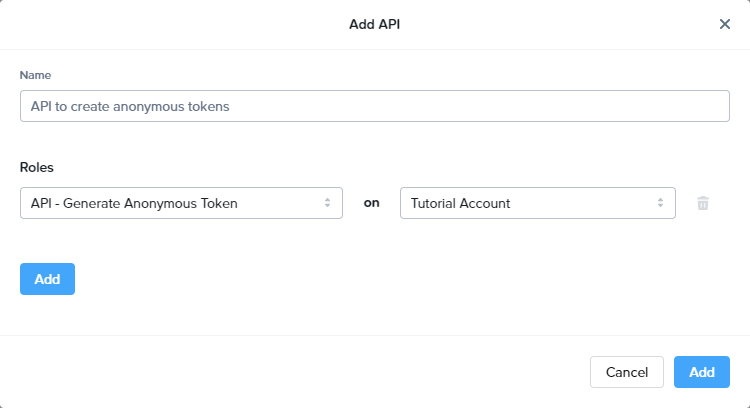
Click Add. The new API will show up in the API list. Click the options menu for the new API and select Manage Credentials.
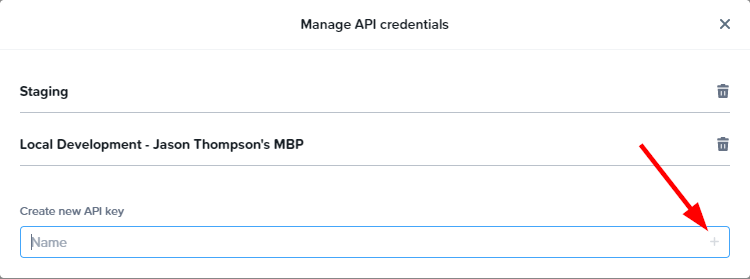
You'll be prompted to create a new API key – start by giving it a name, then click the PLUS ("+") button on the right.
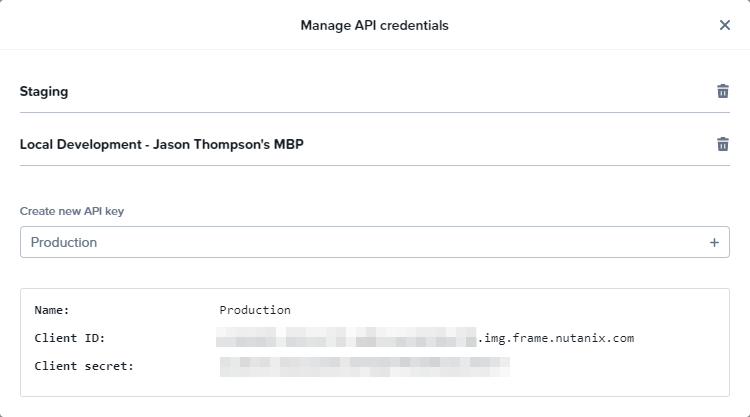
You'll now see your Client ID and Client Secret. Copy these values to somewhere safe, as you won't be able to see the secret again after leaving this screen.
That's it! Now you're ready to add a SAT Provider in the next section.
Creating a Secure Anonymous Token Provider
There are two ways to create a Secure Anonymous Token Provider:
a. From the Dashboard of the desired Frame account, navigate to the Users page where you will land on the Authentication tab.
b. If you start from the Frame Admin console, you can navigate to either the Customer or Organization page and select Users from the left-hand menu.
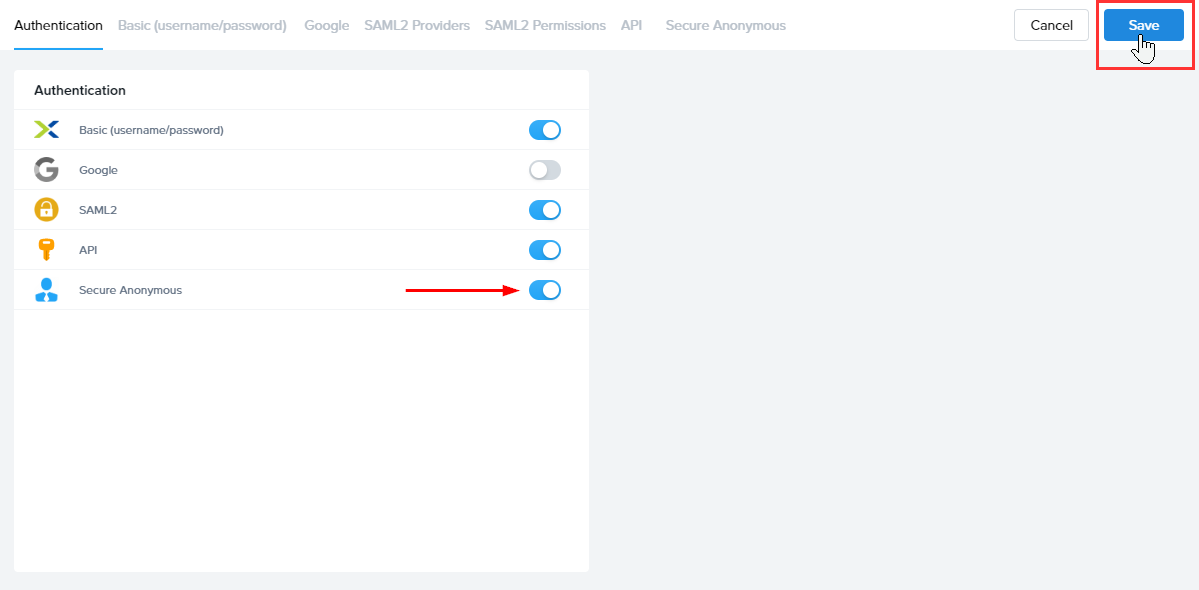
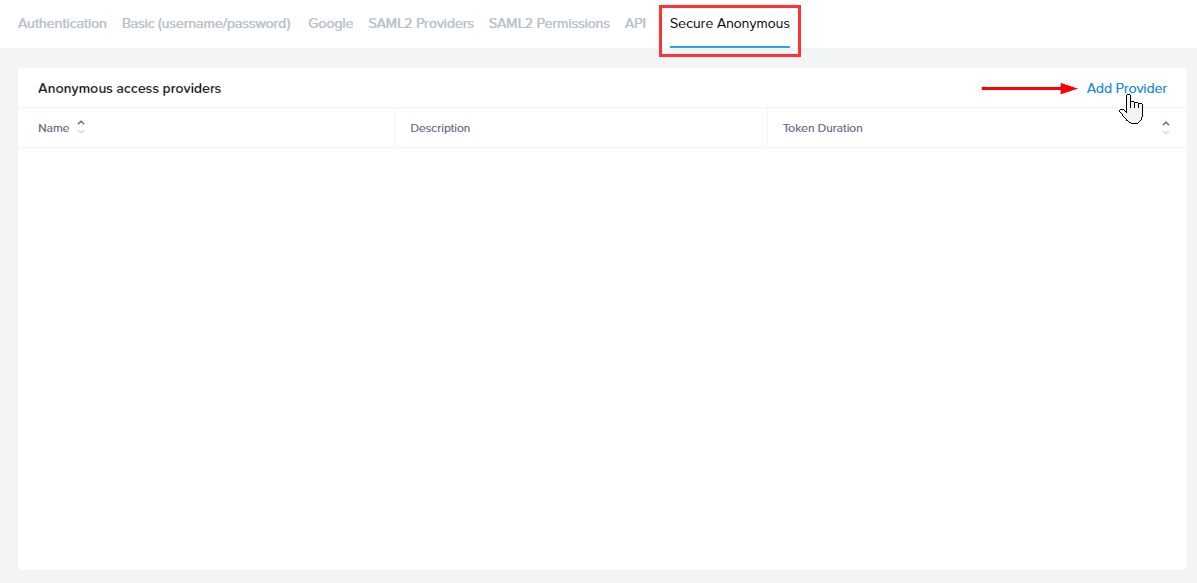
Enable the Secure Anonymous option under Authentication and save; a new Secure Anonymous tab will show up.
Click the Secure Anonymous tab, then click the Add Provider button to the top right.
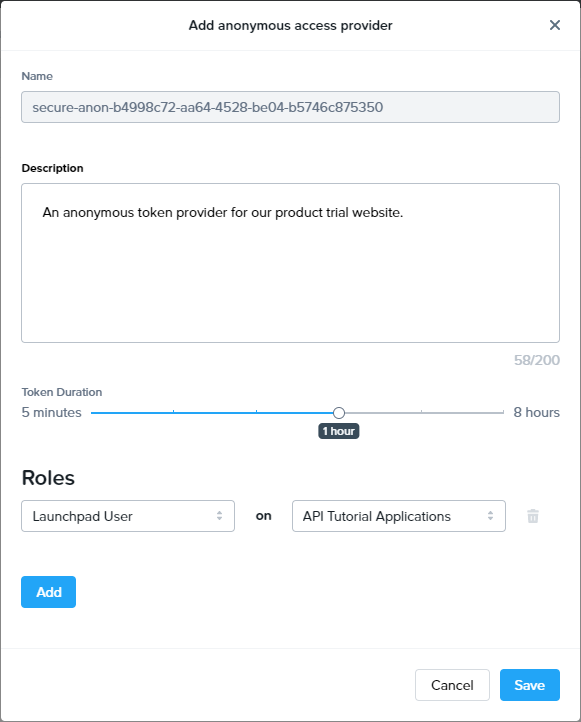
You'll be prompted to describe and configure your new Secure Anonymous provider. You can specify the following:
Property Name Description Description A short description of what you plan to use the Anonymous Token provider for (e.g., public trials) Token Duration How long until the token expires and is no longer valid. Roles and Scope The role will typically be a Launchpad user, and the scope is which account/Launchpad Give it a description that makes sense for your use case, e.g. “Token provider for product trials”. Then, set the token duration you'd like. Finally, select a Role and scope – we recommend only configuring the role for Launchpad Users for security reasons.
Your new Anonymous Access Provider will appear. Click the ellipsis next to the provider and select "Playground." Test generating tokens using the new provider, as well as code examples, in various languages, demonstrating how to make a request for tokens.

Generating Secure Anonymous Tokens
Now that we have an API Client ID and Client Secret from the API setup steps above, we can use the dynamic code snippet examples provided in the Secure Anonymous Playground. Making a token request is pretty simple. It requires API credentials, making a HMAC signature based on those credentials, and then a HTTP POST to your SAT Provider's endpoint.
Security Considerations
Requests for SATs should be executed from a secure backend environment. Requests like these should not be made from client-side JavaScript, for example, as the API credentials can be exposed to the public.
It is your responsibility to secure any self-hosted endpoints that process SAT requests. To clarify, there should not be a public URL on the web that prints out free tokens to any visitor – avoiding this and using best-practices will help prevent unauthorized access, abuse of resources, legal issues, or worse.
Code examples
In the Secure Anonymous Playground, we have a examples for requesting tokens written in Python 3, Node.js, curl, Powershell, and PHP. To try these for yourself, copy an example in your preferred language, then paste in your Client ID and Client Secret, then execute the code. Executing the examples should return a token if everything is configured properly.
Here's an example that prints the output of a SAT request in Python 3:
#!/bin/env python

import hashlib
import hmac
import time
import requests
import base64

# Client credentials
client_id = "<Your API Client ID goes here>"
client_secret = b"<Your API Client Secret goes here>"

# Create signature
timestamp = int(time.time())
to_sign = "%s%s" % (timestamp, client_id)
signature = hmac.new(client_secret, to_sign.encode('utf-8'), hashlib.sha256).hexdigest()

# Prepare http request headers
headers = { "X-Frame-ClientId": client_id, "X-Frame-Timestamp": str(timestamp), "X-Frame-Signature": signature }

# Include optional params such as first_name, last_name, email_domain, email or metadata.
body = {
  "first_name": "John",
  "last_name": "Appleseed",
  "email": "john@example.com",
  "metadata": {
     "data":"favorite food: apples"
  }
}

# Make request
r = requests.post("https://api.console.nutanix.com/v1/<Entity type here (customer, organization, or account)>/<Entity ID goes here>/secure-anonymous/<Secure anonymous provider ID goes here>/tokens", headers=headers, json=body)

# Print the response (a JWT)
print(r.json())
Anonymous Token Parameters
You can provide a few optional parameters when generating anonymous tokens. These parameters let you customize the information provided in the JWT, allowing you to set properties such as:
Optional Anonymous Token Parameters
| Name | Type | Description | Required |
|---|---|---|---|
| first_name | string | “John” for example. | false |
| last_name | string | “Smith” for example. | false |
| string | Example: john.smith@acme.com | false | |
| email_domain | string | Example: acme.com. This will return xxxxxxx@acme.com. | false |
| metadata | object | An object containing any additional information you'd like to supply for your users/token. | false |
If provided, Frame will use the above information for User Activity, Session Trail, and Audit Trail reports.
For customers who wish to use SATs in virtual computer labs, retail point of sale, and other thin client use cases, the best practice is to set the values for the first_name, last_name, and email parameters in the SAT generation request to values that would allow administrators to distinguish and report on Frame usage across the physical devices.
For example, for retail point of sale, you might set first_name to the store ID, last_name to the point of sale location in the store, and email to <store_id>.<location_id>@<domain>.
If the SAT generation requests do not follow this best practice, then administrators will not be able to determine which sessions correspond to which physical devices, as all sessions will be associated with "Anonymous User". This will make it more difficult to troubleshoot performance issues if the endpoint is not easily identifiable.
Using SATs with Launchpad or Launch links
Admins can redirect users to Frame URLs with a token as a query parameter. For an example, let's assume we have following Launchpad URL:
https://console.nutanix.com/acme/projects/demos/launchpad/demo-apps
With that URL in mind, let's assume we've received a token from the SAT API. We'd include the token as a URL search query param:
?token=YOUR_GENERATED_TOKEN_HERE
Result:
https://console.nutanix.com/acme/projects/demos/launchpad/demo-apps?token=YOUR_GENERATED_TOKEN_HERE
And, In the case of a Launch link URL like:
https://frame.nutanix.com/launch?terminalConfigId=XXXXXXXX-XXXX-XXXX-XXXX-XXXXXXXXXXXX.XXXXXXXX-XXXX-XXXX-XXXX-XXXXXXXXXXXX&appId=desktop
Appending ?token=GENERATED_TOKEN_HERE results in:
https://frame.nutanix.com/launch?terminalConfigId=XXXXXXXX-XXXX-XXXX-XXXX-XXXXXXXXXXXX.XXXXXXXX-XXXX-XXXX-XXXX-XXXXXXXXXXXX&appId=desktop&token=GENERATED_TOKEN_HERE
With URLs are appended with a token, when a user goes to the URL, Frame will consume the token from the URL and automatically log the user in. URLs like this can be delivered to users in a number of different ways:
- A link on your website (perhaps open the link in a new tab).
- Redirect to these URLs as part of your user workflow (e.g. example.com/sign-in -> generate token from api -> redirect user to Frame URL)
- Send a link as an email -- be sure the token's expiration duration makes sense for security, tokens begin expiring the moment they're generated.
To ensure great user experience, ensure that the generated tokens have the proper roles/permissions to access the Launchpad or resources you're pointing your users to.
Customize auth flow
When using SATs with Launchpad or Launch links, specific metadata should be specified to point to customer-built and customer-hosted URLs that control what happens when a user logs out or in from Frame's UIs.
{
  first_name: "Jason",
  last_name: "Thompson",
  email: "jason.123456@acme.com",
  metadata: {
    exampleId: 123456,
    language: "EN",
    timezone: "PT",
    favoriteFood: "tacos",
    frame_login_url: "https://example.com/log-back-into-frame",
    frame_logout_url: "https://example.com/log-out-and-thank-you"
  }
}
In the example above, we specified frame_login_url and frame_logout_url.
When these are present, we'll honor the values supplied when users are
using our UI.
These URLs are used when Launchpad and Launch link users are inactive (no keyboard or mouse activity) for 15 minutes. When this happens, we log the user out and prompt the user with options to Leave or Log back in, like so:

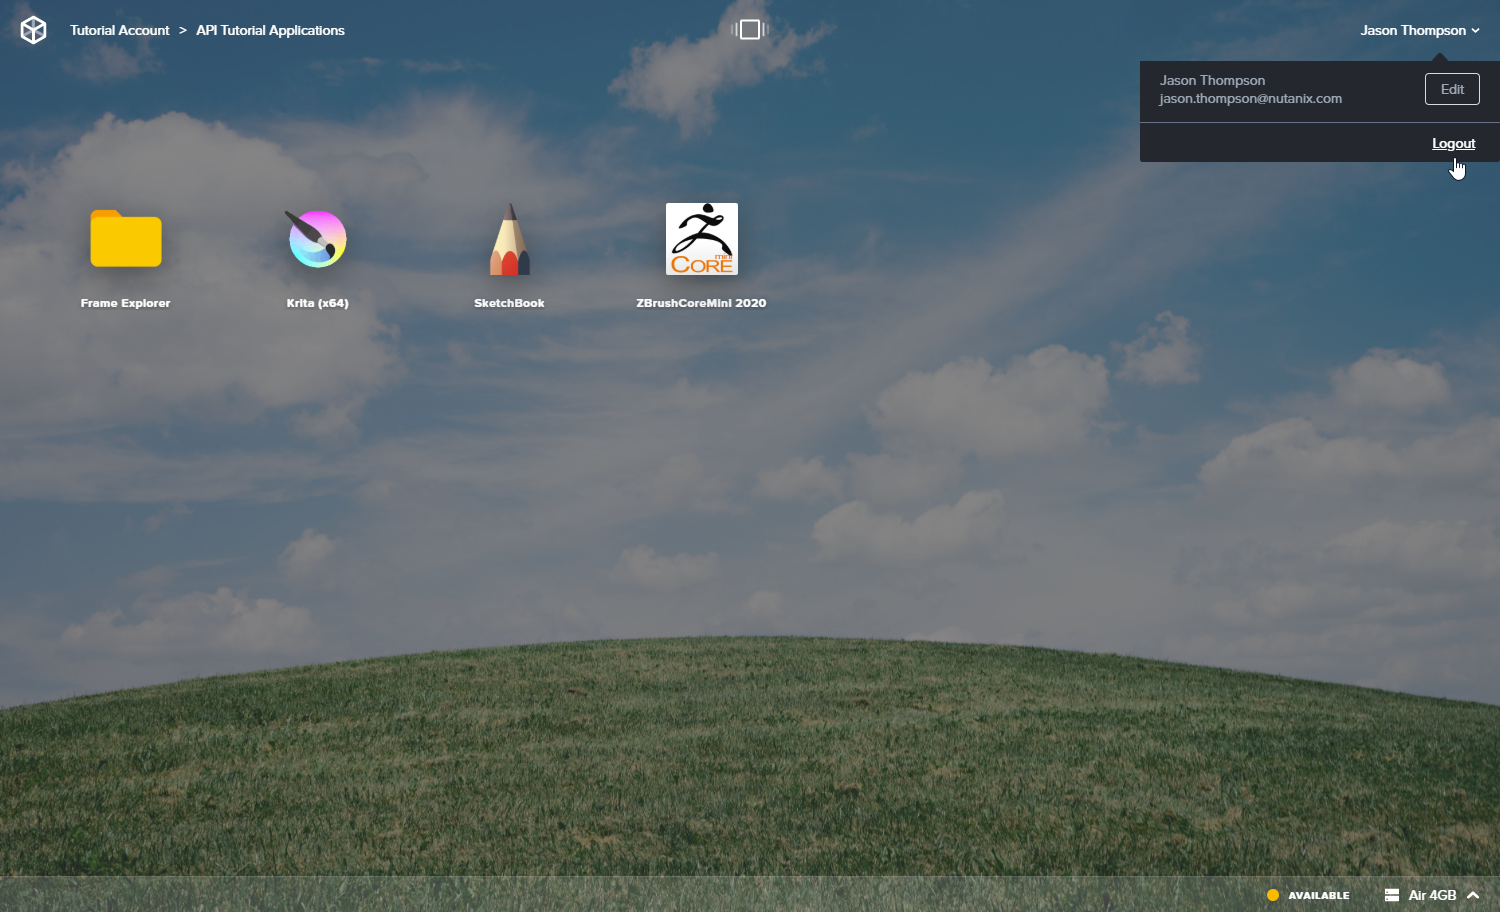
Additionally, when using the Launchpad, the logout URL is tied to the Logout button from the Profile menu at the top-right of the Launchpad. When a user clicks this, Frame invalidates the user's token and redirects the user's browser to the URL specified in the SAT's metadata.
To ensure a great experience, the URL supplied for
frame_login_url should be used to route a user to your website to
generate a new token, then redirect the user
back to their original location with that token. This ensures
compatibility between Launchpad, Launch Links, and PWAs while using
Secure Anonymous Tokens.
SAML2 Users can also take advantage of these custom auth URLs if they specify these parameters in their identity provider's assertion/claims. The process to do this varies for each identity provider; please refer to your identity provider's documentation about adding custom assertions/claims.
Metadata
You can provide custom information for a user when generating Secure Anonymous Tokens – this type of metadata is often called assertions. A simple Node.js example is available on Github that demonstrates how to populate metadata and query it after a token's been generated. We'll use code snippets from this repository in examples below.
Populating metadata
When requesting a token, you can supply a metadata object to the body of the request.
{
  first_name: "Jason",
  last_name: "Thompson",
  email: "jason.123456@acme.com",
  metadata: {
    should_accept_tos: false,
    frame_login_url: "https://example.com/login_url",
    frame_logout_url: "https://example.com/logout_url",
    exampleId: 123456,
    language: "EN",
    timezone: "PT",
    favoriteFood: "tacos"
  }
}
Optional Metadata Parameters
When populating the metadata request body, you can specify a few different options (As shown in the JSON request example above).
| Name | Type | Description | Required |
|---|---|---|---|
| should_accept_tos | string | When set to true, you are accepting the Terms of Service automatically. There will be no UI prompt for accepting the ToS if set to true. This default value is set to false | false |
| frame_login_url | string | URL used when a user attempts to log back in from a closed session. See more here: Customize Auth Flow | false |
| frame_logout_url | string | URL used when a user logs out of the Frame UI. See more here: Customize Auth Flow | false |
Querying metadata
Querying metadata is a simple GET request along with an Authorization header
specifying the token. The token must be specified in the “Bearer” format,
and the API endpoint is
https://cpanel-backend-prod.frame.nutanix.com/api/rest/v1/me/assertions.
async function getUserAssertions(token) {
  const result = await axios({
    url:
      "https://cpanel-backend-prod.frame.nutanix.com/api/rest/v1/me/assertions",
    headers: { Authorization: `Bearer ${token}` },
  });
  return result.data;
}
Retrieving Metadata from within Windows
This metadata can also be retrieved from within the remote OS environment
during a running session. This is made easy through the use of a session
token that's made available as an environment variable labeled as
FRAME_SESSION_TOKEN. This Session Token is different than the token
used to start the session (and can't be used for starting sessions),
but it relates to the same user. This token also requires a different
endpoint for querying the assertions. Here's an example of how to do
this in Powershell (5.x):
# Set TLS compatibility for Powershell 5.x
[Net.ServicePointManager]::SecurityProtocol = [Net.SecurityProtocolType]::Tls -bor [Net.SecurityProtocolType]::Tls11 -bor [Net.SecurityProtocolType]::Tls12

$sessionToken = "$env:FRAME_SESSION_TOKEN"
$uri = 'https://messaging.frame.nutanix.com/api/rest/v1/me/assertions'
$headers = @{'Authorization' = "Bearer $sessionToken"}

$response = Invoke-RestMethod -Uri $uri -Headers $headers -ContentType "application/json" -Method Get

Write-Host $response
You can query metadata like this in a "pre-session" script and use the supplied information to customize your applications/environment, mount network drives, etc. Refer to the Scripting documentation for further details.
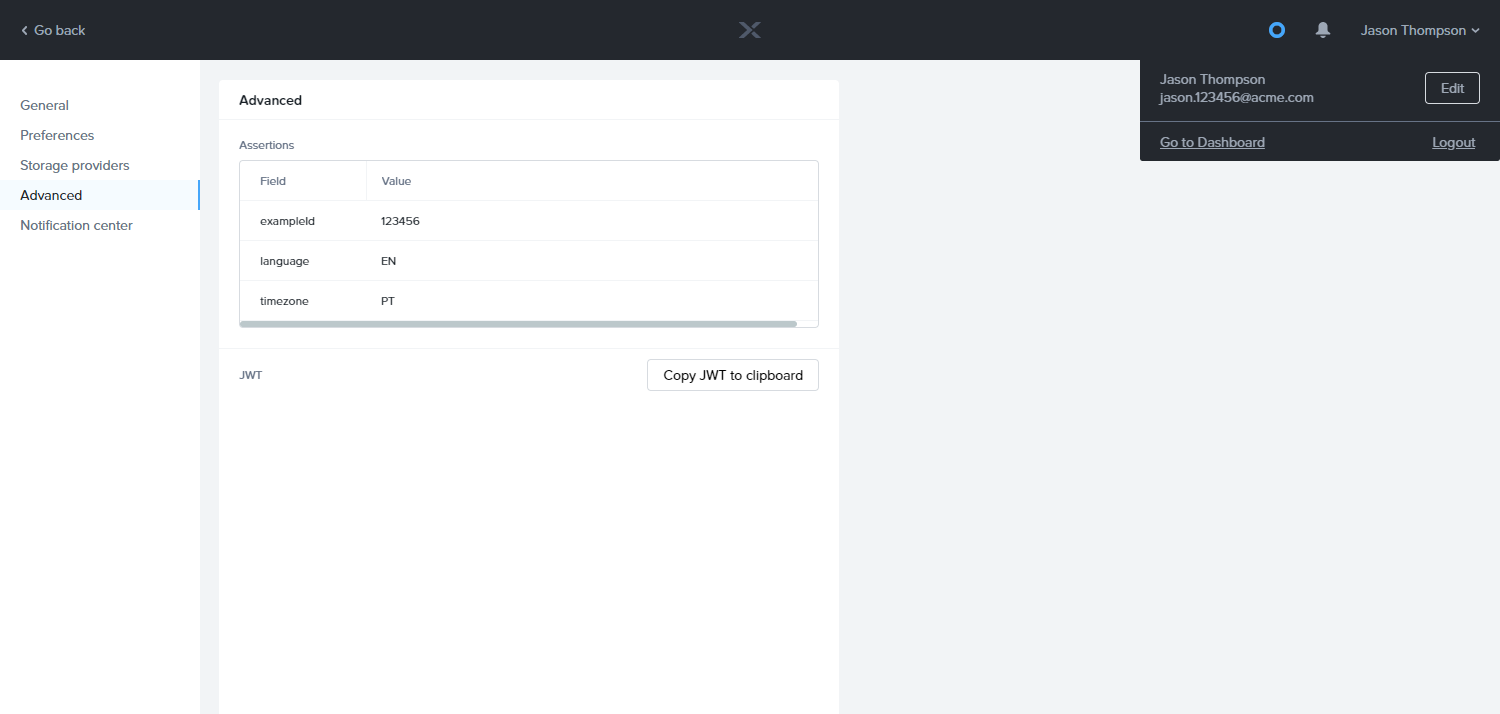
Viewing Metadata from Launchpad
Anyone can view their metadata from Launchpad from the account profile page. To view the supplied metadata or “assertions,” a user can click on their name at the top-right of the Launchpad to open their User menu. From there, click Profile This will take you to the user's profile page – from there, click Advanced on the left-hand side. This page shows a table of assertions for the current user, like so: